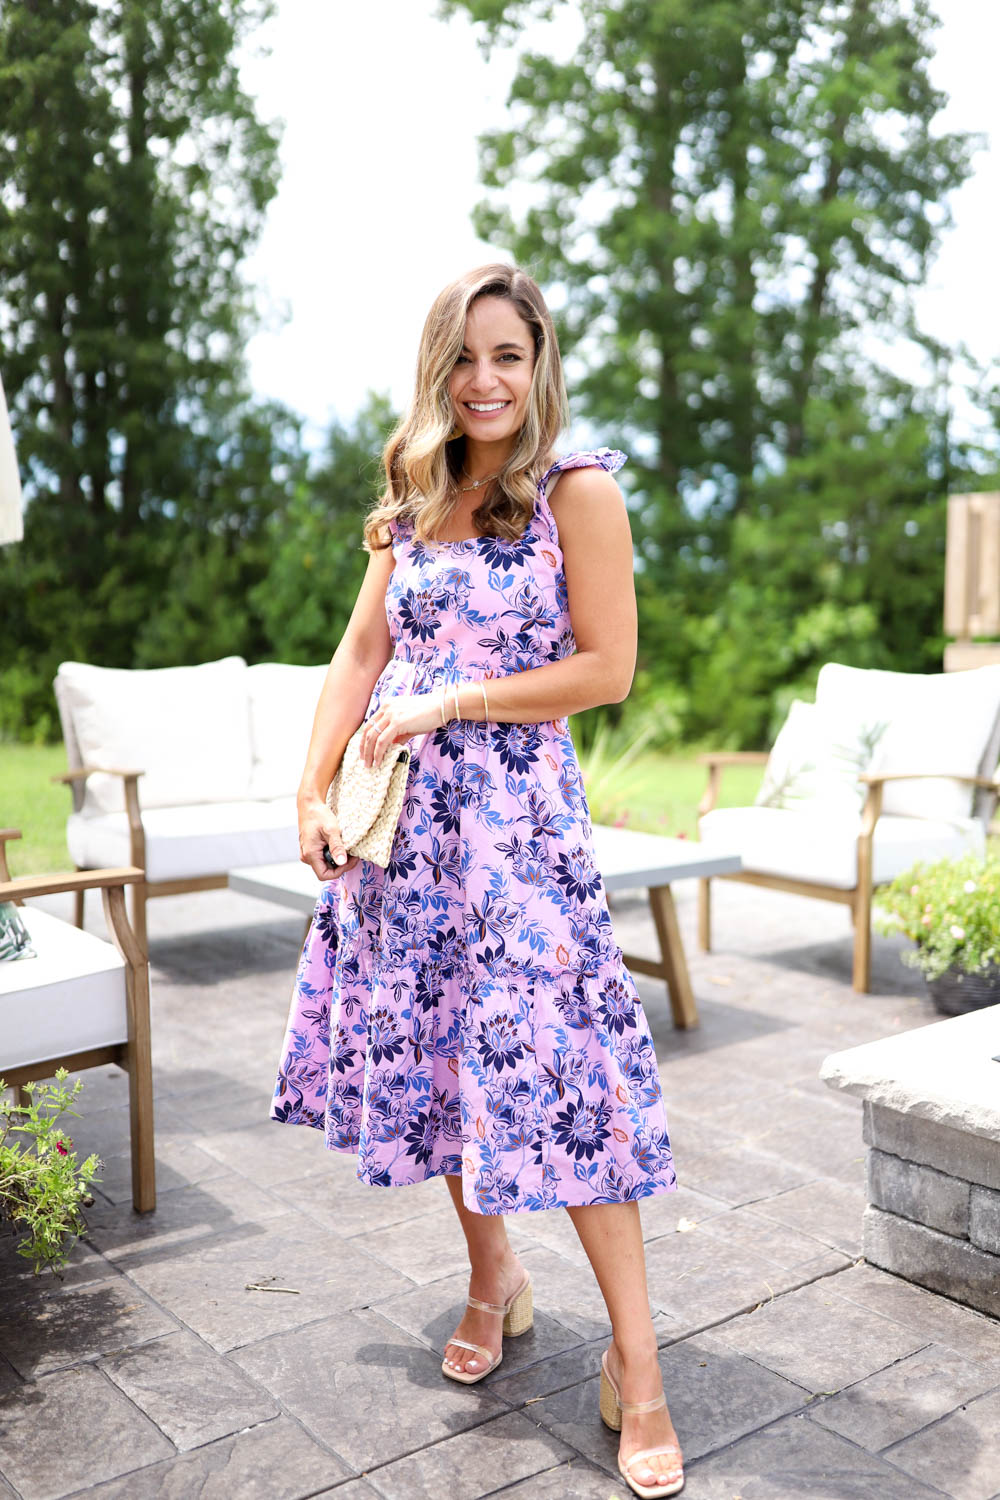
One of my very favorite parts about blogging is the challenge of creating beautiful and creative imagery. I’m not a pro and this is an ongoing learning experience for me, but a challenge I personally want to master. While I still have a lot to learn, and am very much still a novice, over the last year I’ve learned a few new tricks that have helped improve my photos, and my photo editing process. I’ve got it down to a science enough that I thought it was time to share! Plus, it will be fun looking back on this post a year from now and seeing how far I’ve come. So let’s go, photo tips from a very non-professional photographer.
How I Edit my Photos in Lightroom
I’ll start with the basics first, what equipment I use.
What Camera Do I Use?
I have a Canon 80D, and use a EFS 18-135mm (kit lens) and EF 50mm 1:1.8 lens. Both of these lenses are inexpensive, and entry level, but they’ve served me well. I tend to use the kit lens more than the EF 50mm, because I’ve found that with full length photography, which is what we do often, it makes the photos too soft for my tastes. However, it takes beautiful portraits and detail shots. I do plan, when I’m able, to add another lens to the mix, but I’ll have to let you know more about that later.
How Do I Shoot?
So, how do I shoot. Well I should say, how does Steven shoot? My sweet husband is a good sport, and although he doesn’t mess with a lot of the camera settings, he’ll try all the angles and follow me around town snapping pictures, while keeping the kids entertained too. We’re a circus let me tell you. Last year I really wanted to learn more about my camera, so I set out to learn how to use it in manual mode. While I did learn, and enjoyed knowing how to use my camera in all scenarios, I’ve found that just using the camera in the “P” setting and adjusting ISO and exposure lands us with the most consistent and best results. In low light, I bump the ISO (but not too high or it’s grainy). I will sometimes boost the exposure on the camera if they seem to be too dark, but I’ve found that if I mess with that too much on the camera, the end result is a photo that is too blown out and doesn’t have a lot of detail. I’ve found it’s better to have a darker photo on the camera, than one that is too light and fuzzy. Lightroom can be magic on those dark photos, which you’ll see below.
When I shoot photos indoors, in lower lighting, I use my tripod, since darker lighting leads to shaky photos I enjoy the stability the tripod gives.
Where Do I Shoot?
The most beautiful pictures come from a cloudy day, or if you can find a building or a tree that shades just a little, but lets just a little bit of light through, the result is magic.
But Really, How I Edit My Photos in Lightroom
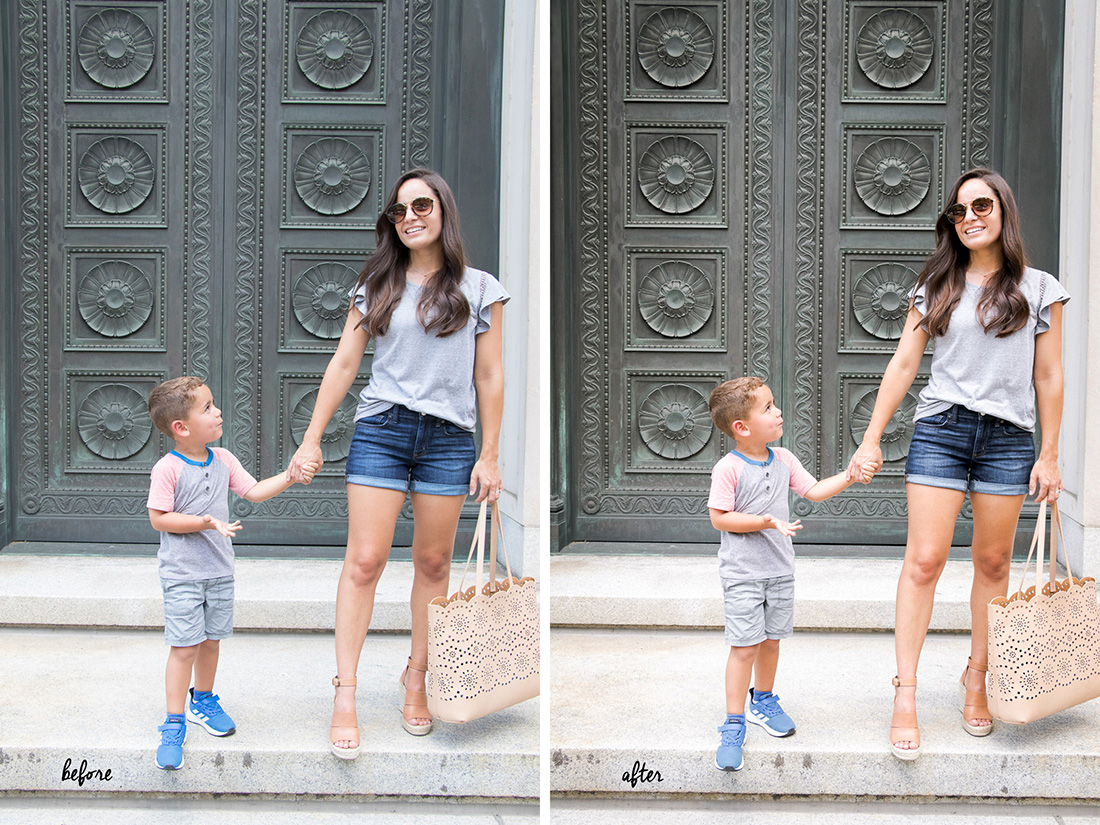
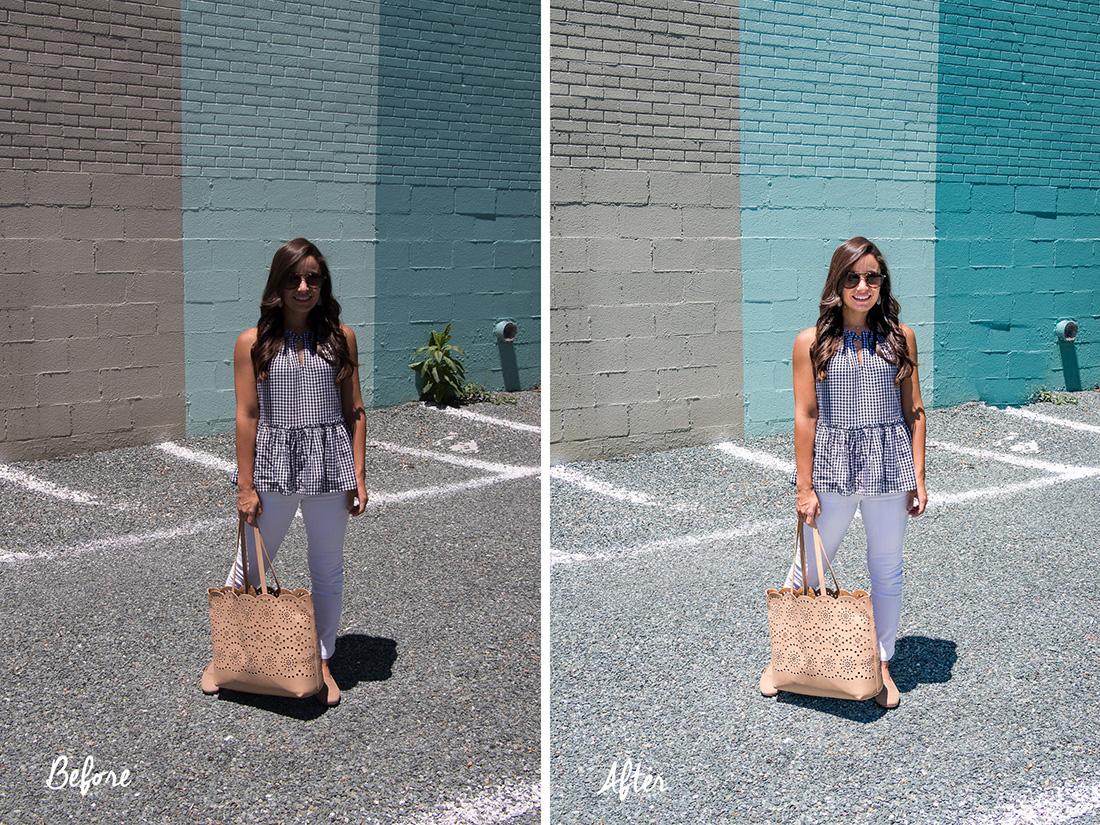
Ok, enough of all that, I’ll get to what this post is actually about, my editing process. I’ve found that Lightroom, when you really dig into all the things it can do, can really do wonders for a photo. I have a few before and afters I will show, but for the step by step, I used a photo that didn’t come off of the camera particularly well. It was very shadowy and was taken in direct sunlight, yet I was still able to salvage it in Lightroom.
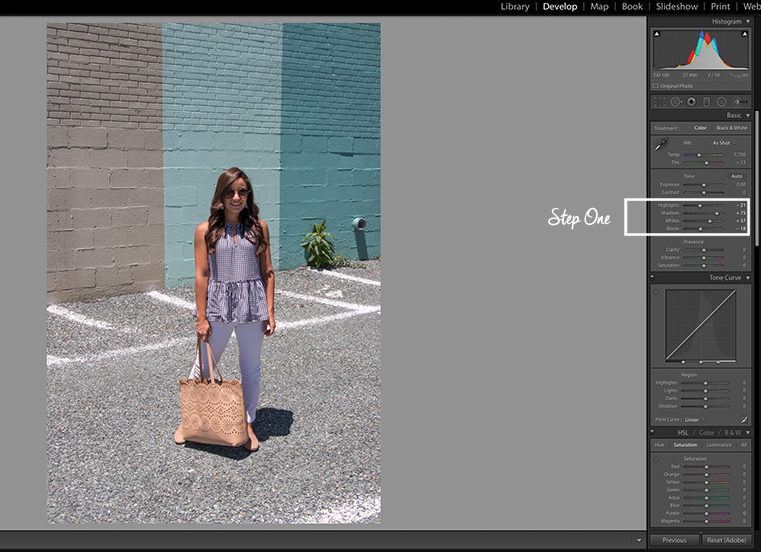
Step One:
I start up at the top and adjust the highlights, shadows and white and black clipping. I used to immediately jump to exposure when a photo was dark, but I’ve found I get much better results waiting to do that until I make a few adjustments. I always bump the shadows way up, and knock down highlights just until the photo looks a little more even. Then I boost white and bring down darks. I personally light bright whites in my photos. Bringing down the blacks gives the photo rich contrast.
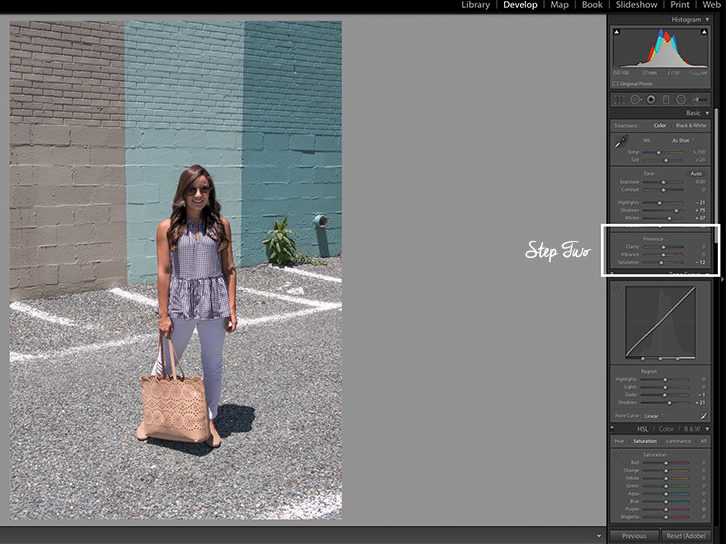
Step Two:
Next I come down to presence and bring down the saturation. I go back in a few steps and bring in saturation with the colors I want to bring out. Sometimes I will also boost the vibrance, this photos didn’t particularly need it.
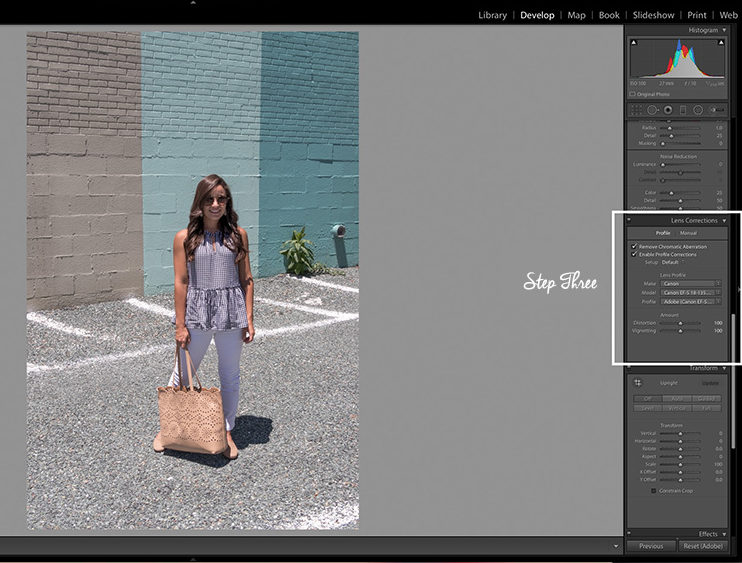
Step Three
Next I go down to lens correction. This tends to brighten the photo just a little bit for me. I click remove chromatic abberation and enable profile correction.
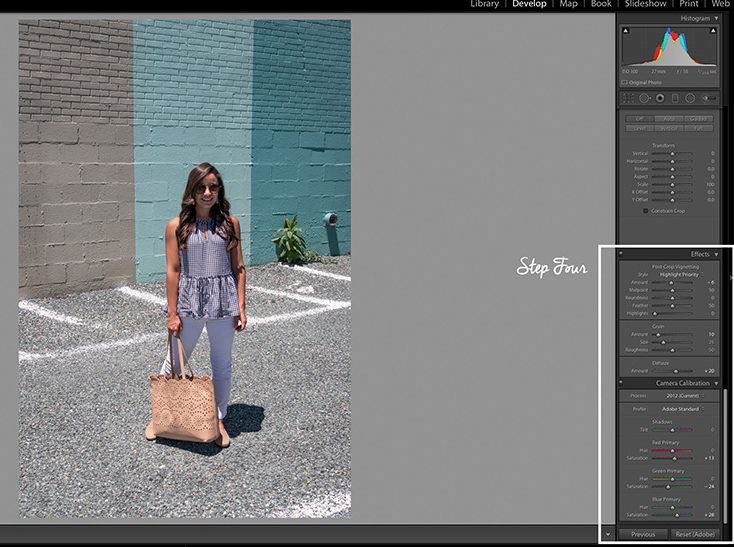
Step Four
Next I go just below the lens correction and make adjustments in camera calibration. I personally like to turn down the green saturation and turn up the blue saturation in my photos, this does change from photo to photo. Then I decrease high priority to give the photo a little vignette and increase grain just a tad.
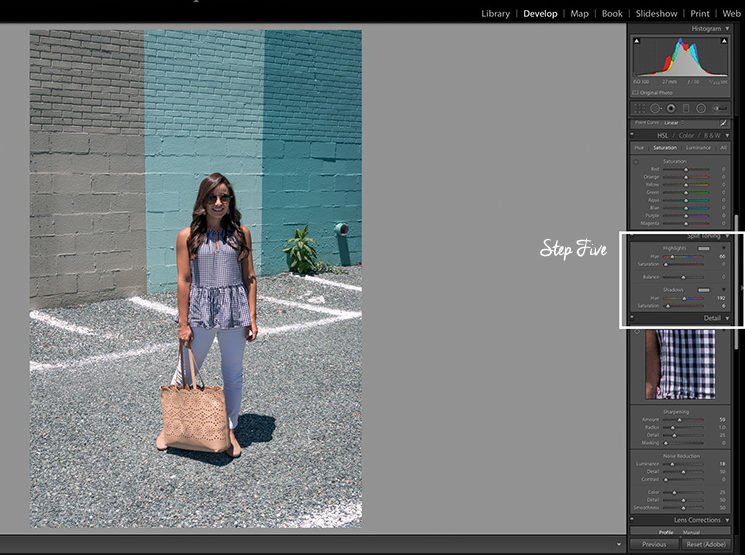
Step Five
Then I go up to split toning. I like to make my highlights golden and my shadows blue, but I’ve also used different combinations depending on the photo. Play around with that, it really can do a lot for a picture! After I make those adjustments I tend to go and adjust exposure and contrast.
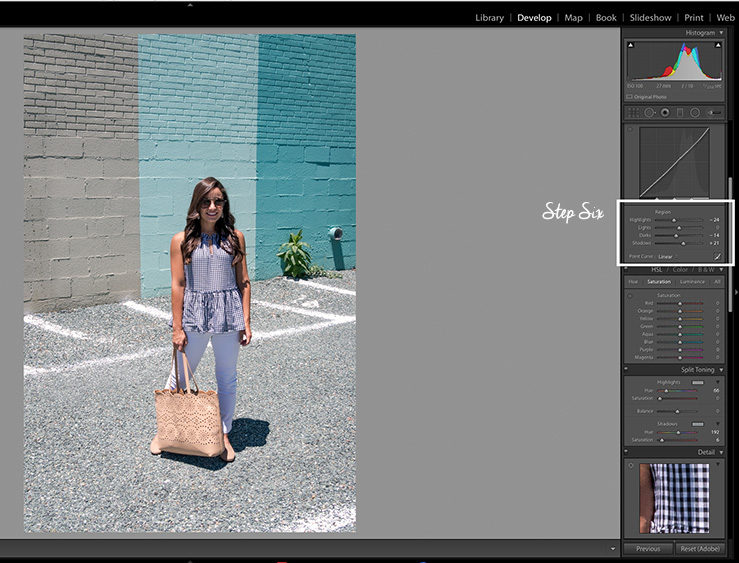
Step Six
Next I go right above the HSL and adjust the tone. Here I tend to turn down highlights, turn up lights (sometimes), turn up shadows and turn down darks. I personally prefer the darks to come down because I like a little contrast in my photos.
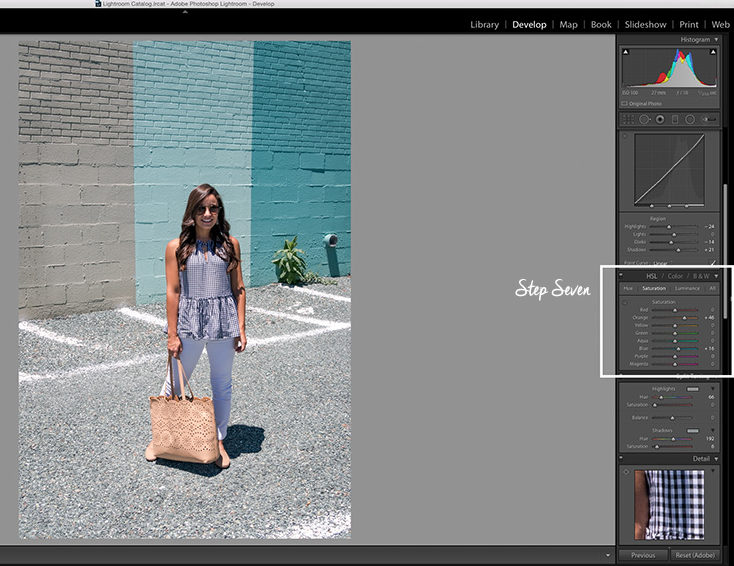
Step Seven
Now, the HSL. I go to saturation first and bump up the orange and any other color I want to bring out. I play around with saturating and desaturating the colors until I get what I like. I also go back and forth between saturation and luminance. Turning up the orange luminance helps my skin tone look natural. I also turn down green a lot, however, since my skin is olive toned, it will sometimes alter my skin color if I take too much green out.
Step Eight
This step is not for every picture, but this particular picture there was a lot of shadowing, in comes the mask tool. At the very top on the right hand side, the little wand looking thing is what I’m talking about. I use the wand to paint the area I want to adjust, in this case it was my face. Then I turned up the shadows, turned down the contrast, sharpness and noise. I will make adjustments until I get the effect I want. I also used a separate mask on my pants to lighten them because they were shadowed. I will also use the mask tool sometimes to soften a background that is too busy. If you want to see where you are painting with the tool, simply hit “o” on your keyboard, it will turn your path red. Then hit “o” again to turn it off and make your adjustments.
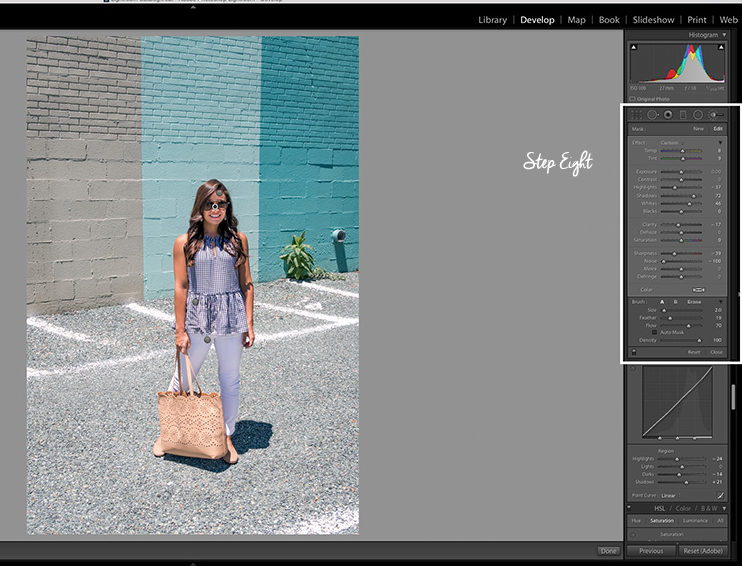
Step Nine
Nine is basically just making final adjustments. I will revisit each step and make small adjustments until I get the desired result.
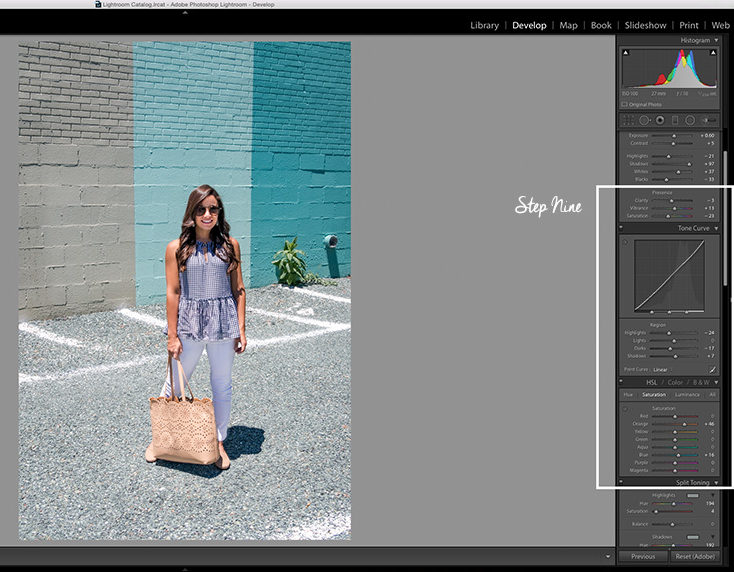
Step Ten
Finishing touches! In this photo I removed the plant behind me, it’s not the best spot removal I’ve ever done, but it’s good enough, haha! If the spot removal is difficult, I will move over to photoshop, which I feel like has more flexibility in tools.
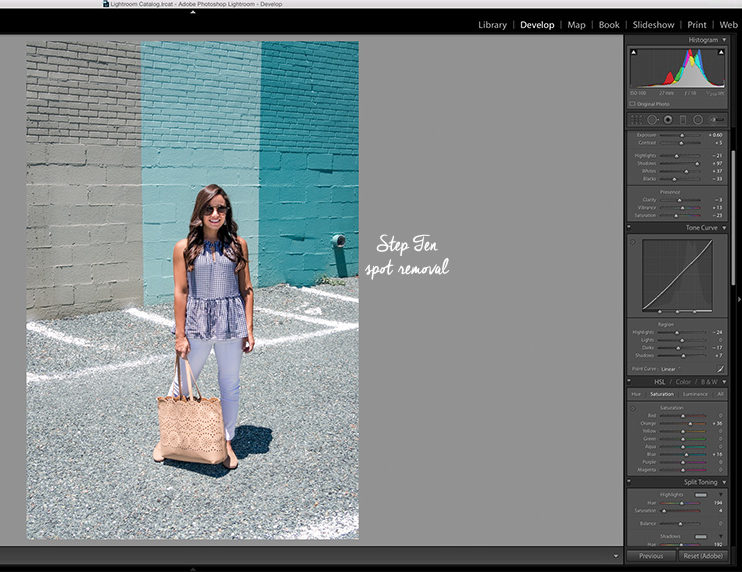
Presets
I’ve purchased presets and made presets of my own which really speed up my process. Although I have liked some of the presets I’ve purchased, I’ve found that some of the styles don’t actually match mine when I apply them to my own photo. I’ll show you an example of a preset I purchased; I loved her photos, yet when I applied it to my own this is what I got:
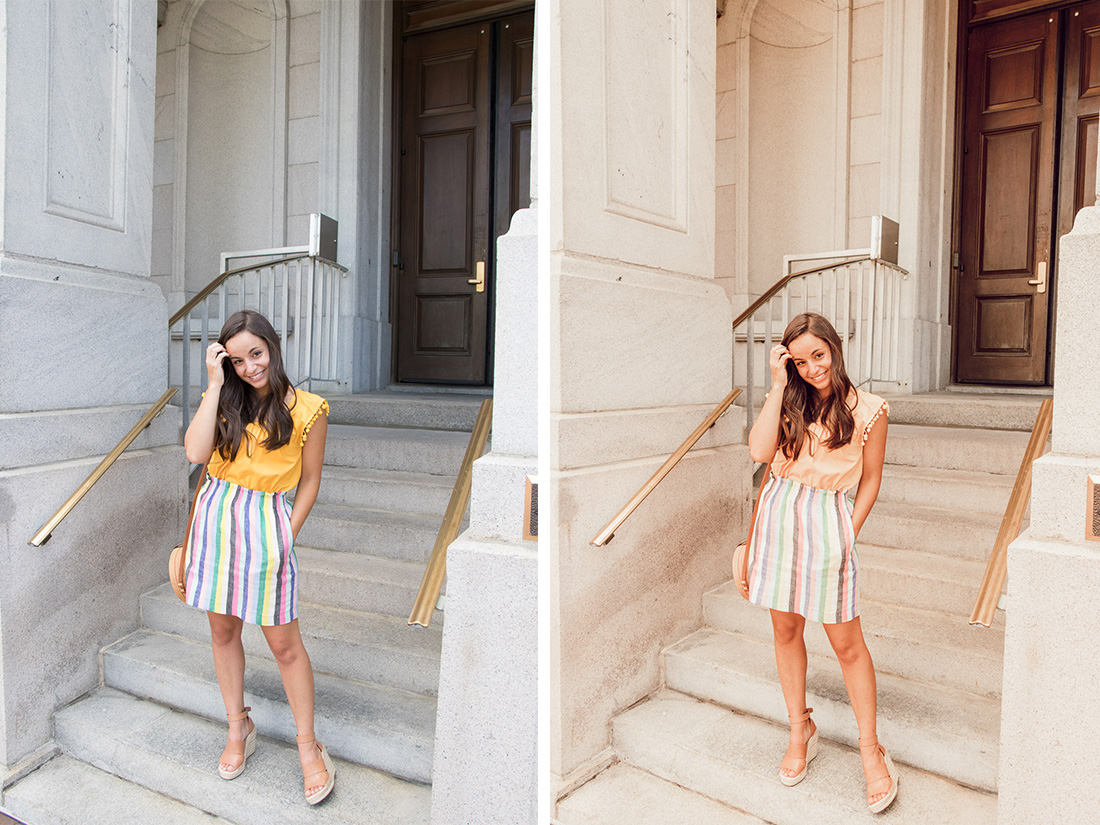
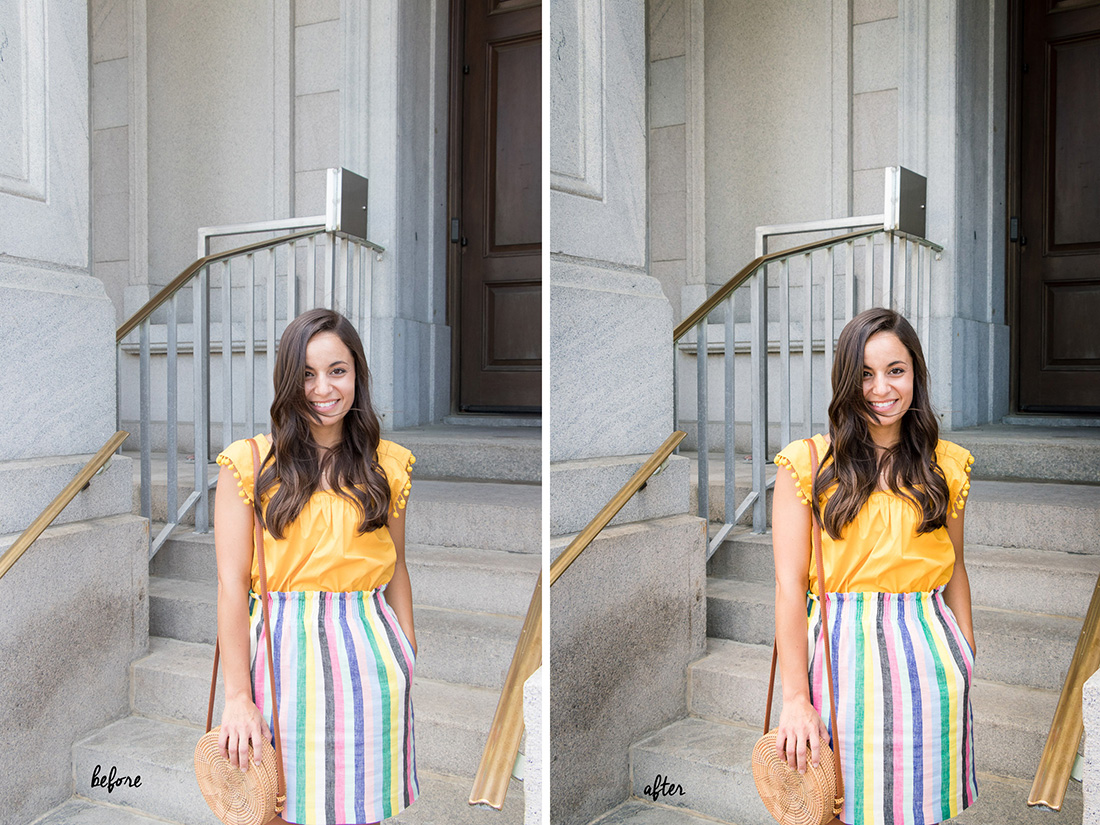
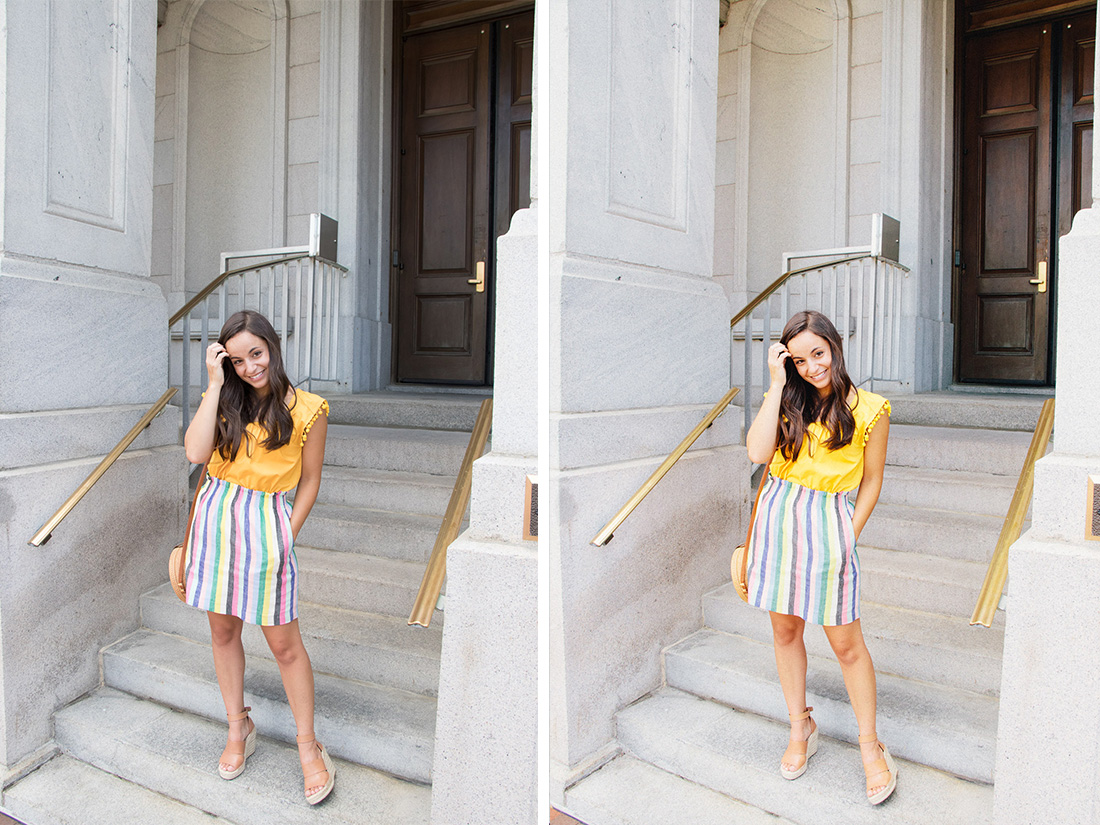
While I didn’t love the above preset (and kind of wish I didn’t spend $$$ on it) there have been plenty I’ve enjoyed and work well in certain photos. Here a few examples of presets I use, although they may have not been the best for these photos.
VSCO Kodak Porta 400 UC
NK Presets
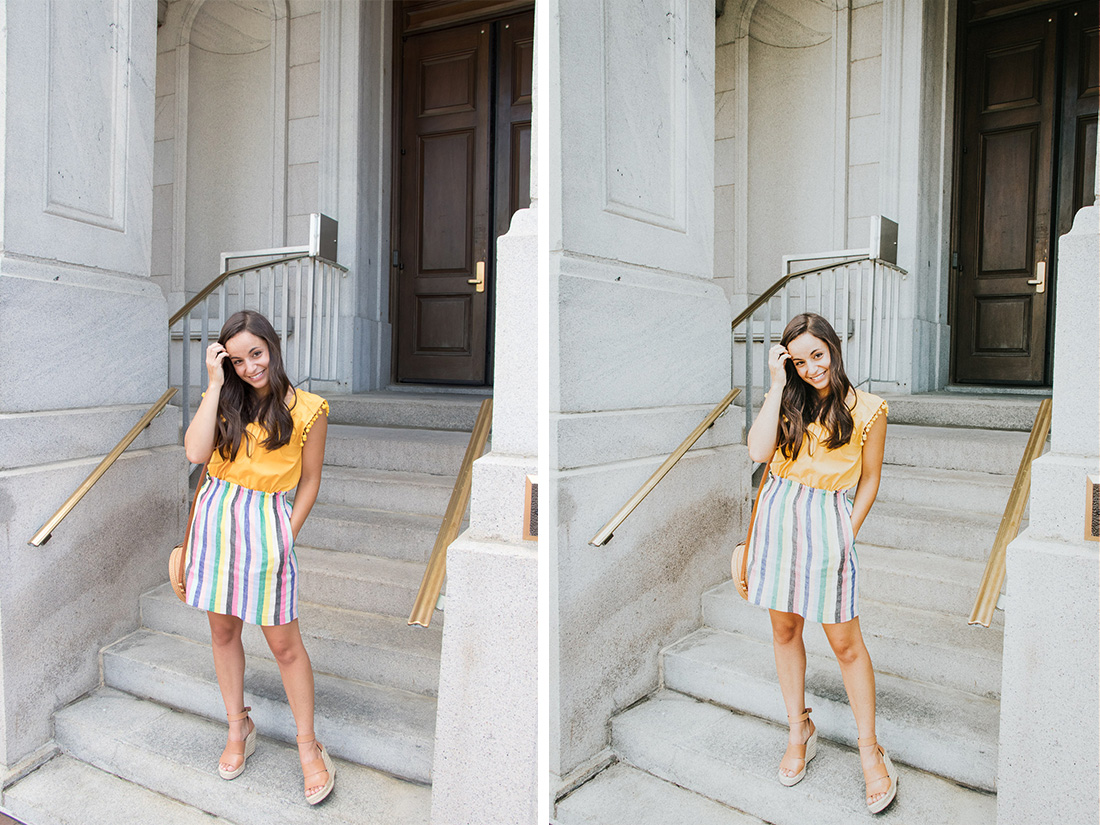
Nihya Kaye presets are some of my favorite. I do have to edit them, but they’re a great starting point and make for really unique pictures.
Finally, this is the photo with my own adjustments which I ended up liking more than any presets I had. I chose to go this route, because I do like the desaturated look of the NK preset, however, it doesn’t do the top and skirt justice.
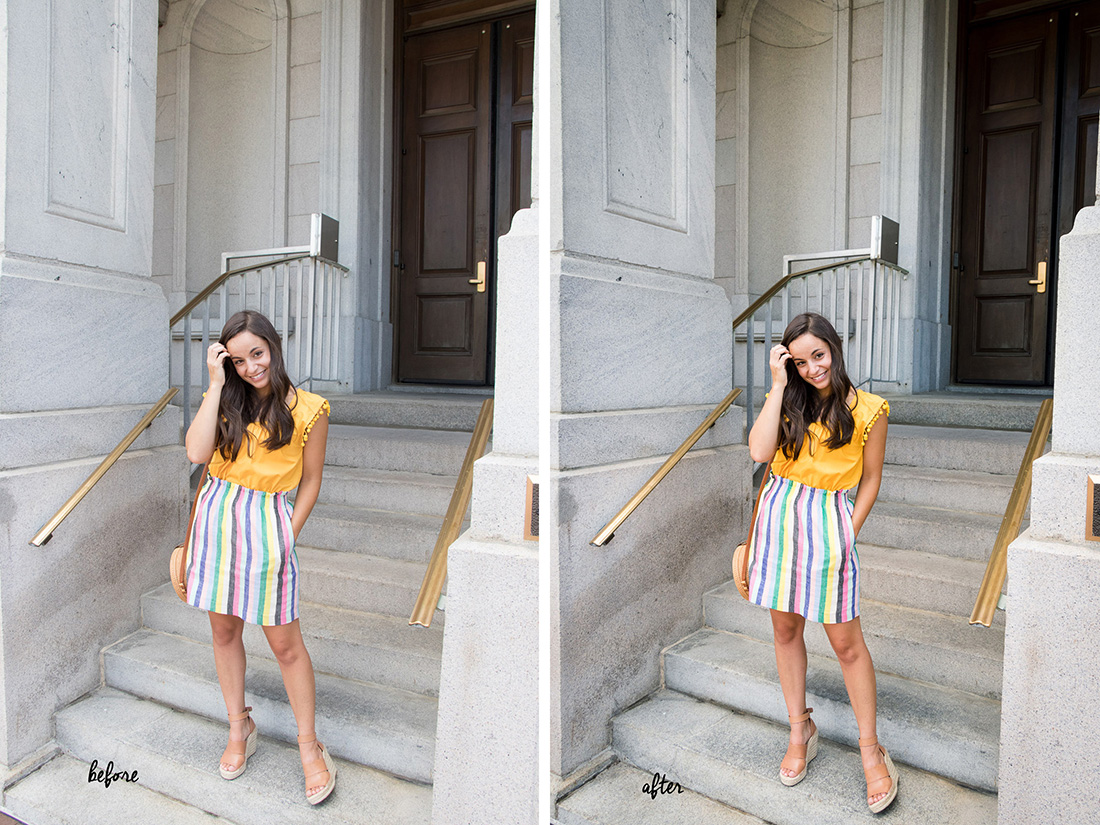
If you’re still reading after that long post, thank you! I hope this helps or maybe inspires you to try a new preset on your photos next time!
-Brooke
